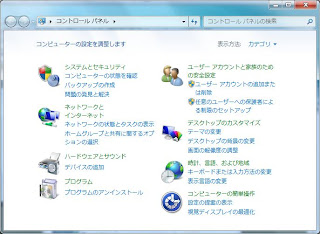
1.コントロールパネルからデスクトップのカスタマイズを選ぶ
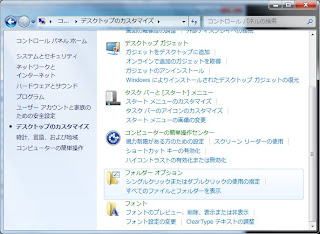
2.フォルダーオプションを選択する
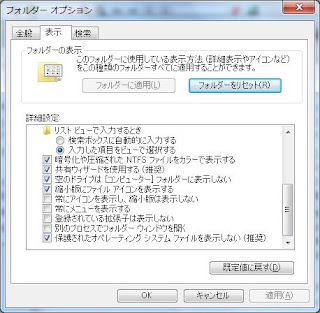
3.いつものウィンドウが出てくるので、「登録している拡張子の~」のチェックを外す
以上。

 Microsoft Windows [Version 6.1.7100]
 Copyright (c) 2009 Microsoft Corporation.  All rights reserved.

 J:\Windows\system32>bcdedit.exe

 Windows ブート マネージャー
 --------------------------------
 identifier              {bootmgr}
 device                  partition=C:
 description             Windows Boot Manager
 locale                  ja-JP
 inherit                 {globalsettings}
 default                 {current}
 resumeobject            {6d567674-…
 displayorder            {ntldr}
                         {current}
 toolsdisplayorder       {memdiag}
 timeout                 30

 Windows レガシ OS ローダー
 --------------------------------
 identifier              {ntldr}
 device                  partition=C:
 path                    \ntldr
 description             以前のバージョンの Windows

 Windows ブート ローダー
 --------------------------------
 identifier              {current}
 device                  partition=J:
 path                    \Windows\system32\winload.exe
 description             Windows 7
 locale                  ja-JP
 inherit                 {bootloadersettings}
 recoverysequence        {6d567676-444b…
 recoveryenabled         Yes
 osdevice                partition=J:
 systemroot              \Windows
 resumeobject            {6d567674-…
 nx                      OptIn
 J:\Windows\system32>bcdedit.exe /default {ntldr}
 この操作を正しく終了しました。

 J:\Windows\system32>bcdedit.exe /timeout 10
 この操作を正しく終了しました。
 J:\Windows\system32>bcdedit.exe /enum {bootmgr}

 Windows ブート マネージャー
 --------------------------------
 identifier              {bootmgr}
 device                  partition=C:
 description             Windows Boot Manager
 locale                  ja-JP
 inherit                 {globalsettings}
 default                 {ntldr}
 resumeobject            {6d567674-…
 displayorder            {ntldr}
                          {current}
 toolsdisplayorder       {memdiag}
 timeout                 10
▼tar tvfコマンドでtarファイルの中身を閲覧

 -bash-3.00$ tar tvf ../test.tar
 drwxr-xr-x 101/10       0  5月 13日 18:13 2009年 testdir/
 drwxr-xr-x 101/10       0  5月 13日 18:13 2009年 testdir/1/
 -rw-r--r-- 101/10       0  5月 13日 18:13 2009年 testdir/1/a
 -rw-r--r-- 101/10       0  5月 13日 18:13 2009年 testdir/1/b
 -rw-r--r-- 101/10       0  5月 13日 18:13 2009年 testdir/1/c
 -rw-r--r-- 101/10       0  5月 13日 18:13 2009年 testdir/1/d
 -rw-r--r-- 101/10       0  5月 13日 18:13 2009年 testdir/1/e
 -rw-r--r-- 101/10       0  5月 13日 18:13 2009年 testdir/1/f
 -rw-r--r-- 101/10       0  5月 13日 18:13 2009年 testdir/1/g
 drwxr-xr-x 101/10       0  5月 13日 18:14 2009年 testdir/2/
 -rw-r--r-- 101/10       0  5月 13日 18:14 2009年 testdir/2/1
 -rw-r--r-- 101/10       0  5月 13日 18:14 2009年 testdir/2/2
 -rw-r--r-- 101/10       0  5月 13日 18:14 2009年 testdir/2/3
 -rw-r--r-- 101/10       0  5月 13日 18:14 2009年 testdir/2/4
 -rw-r--r-- 101/10       0  5月 13日 18:14 2009年 testdir/2/5
 -rw-r--r-- 101/10       0  5月 13日 18:14 2009年 testdir/2/6
 drwxr-xr-x 101/10       0  5月 13日 18:14 2009年 testdir/3/
 -rw-r--r-- 101/10       0  5月 13日 18:14 2009年 testdir/3/7
 -rw-r--r-- 101/10       0  5月 13日 18:14 2009年 testdir/3/8
 -rw-r--r-- 101/10       0  5月 13日 18:14 2009年 testdir/3/9
 -rw-r--r-- 101/10       0  5月 13日 18:14 2009年 testdir/3/10
 -rw-r--r-- 101/10       0  5月 13日 18:14 2009年 testdir/3/11
 -rw-r--r-- 101/10       0  5月 13日 18:14 2009年 testdir/3/12


▼exclude-fileを表示

 -bash-3.00$ cat exclude-file
 testdir/2


▼exclude-fileを除外してtarファイルの中身を確認

 -bash-3.00$ tar tvfX ../test.tar ./exclude-file
 drwxr-xr-x 101/10       0  5月 13日 18:13 2009年 testdir/
 drwxr-xr-x 101/10       0  5月 13日 18:13 2009年 testdir/1/
 -rw-r--r-- 101/10       0  5月 13日 18:13 2009年 testdir/1/a
 -rw-r--r-- 101/10       0  5月 13日 18:13 2009年 testdir/1/b
 -rw-r--r-- 101/10       0  5月 13日 18:13 2009年 testdir/1/c
 -rw-r--r-- 101/10       0  5月 13日 18:13 2009年 testdir/1/d
 -rw-r--r-- 101/10       0  5月 13日 18:13 2009年 testdir/1/e
 -rw-r--r-- 101/10       0  5月 13日 18:13 2009年 testdir/1/f
 -rw-r--r-- 101/10       0  5月 13日 18:13 2009年 testdir/1/g
 testdir/2/ を除外します。
 testdir/2/1 を除外します。
 testdir/2/2 を除外します。
 testdir/2/3 を除外します。
 testdir/2/4 を除外します。
 testdir/2/5 を除外します。
 testdir/2/6 を除外します。
 drwxr-xr-x 101/10       0  5月 13日 18:14 2009年 testdir/3/
 -rw-r--r-- 101/10       0  5月 13日 18:14 2009年 testdir/3/7
 -rw-r--r-- 101/10       0  5月 13日 18:14 2009年 testdir/3/8
 -rw-r--r-- 101/10       0  5月 13日 18:14 2009年 testdir/3/9
 -rw-r--r-- 101/10       0  5月 13日 18:14 2009年 testdir/3/10
 -rw-r--r-- 101/10       0  5月 13日 18:14 2009年 testdir/3/11
 -rw-r--r-- 101/10       0  5月 13日 18:14 2009年 testdir/3/12


近くの鳥くらいなら、400mmあれば十分撮れますね